TL;DR
- You don't need a studio or a DSLR — a smartphone, a window, and a white background will get you 80% of the way there
- Light is the #1 variable. Natural window light on an overcast day beats a cheap ring light every time
- Shoot minimum 5 angles per product: hero, back, side, detail close-up, and lifestyle
- Your main image must be white background for Amazon and Flipkart — lifestyle scenes work better on Shopify and Instagram
- 7 beginner mistakes kill more conversions than bad gear — avoid them first
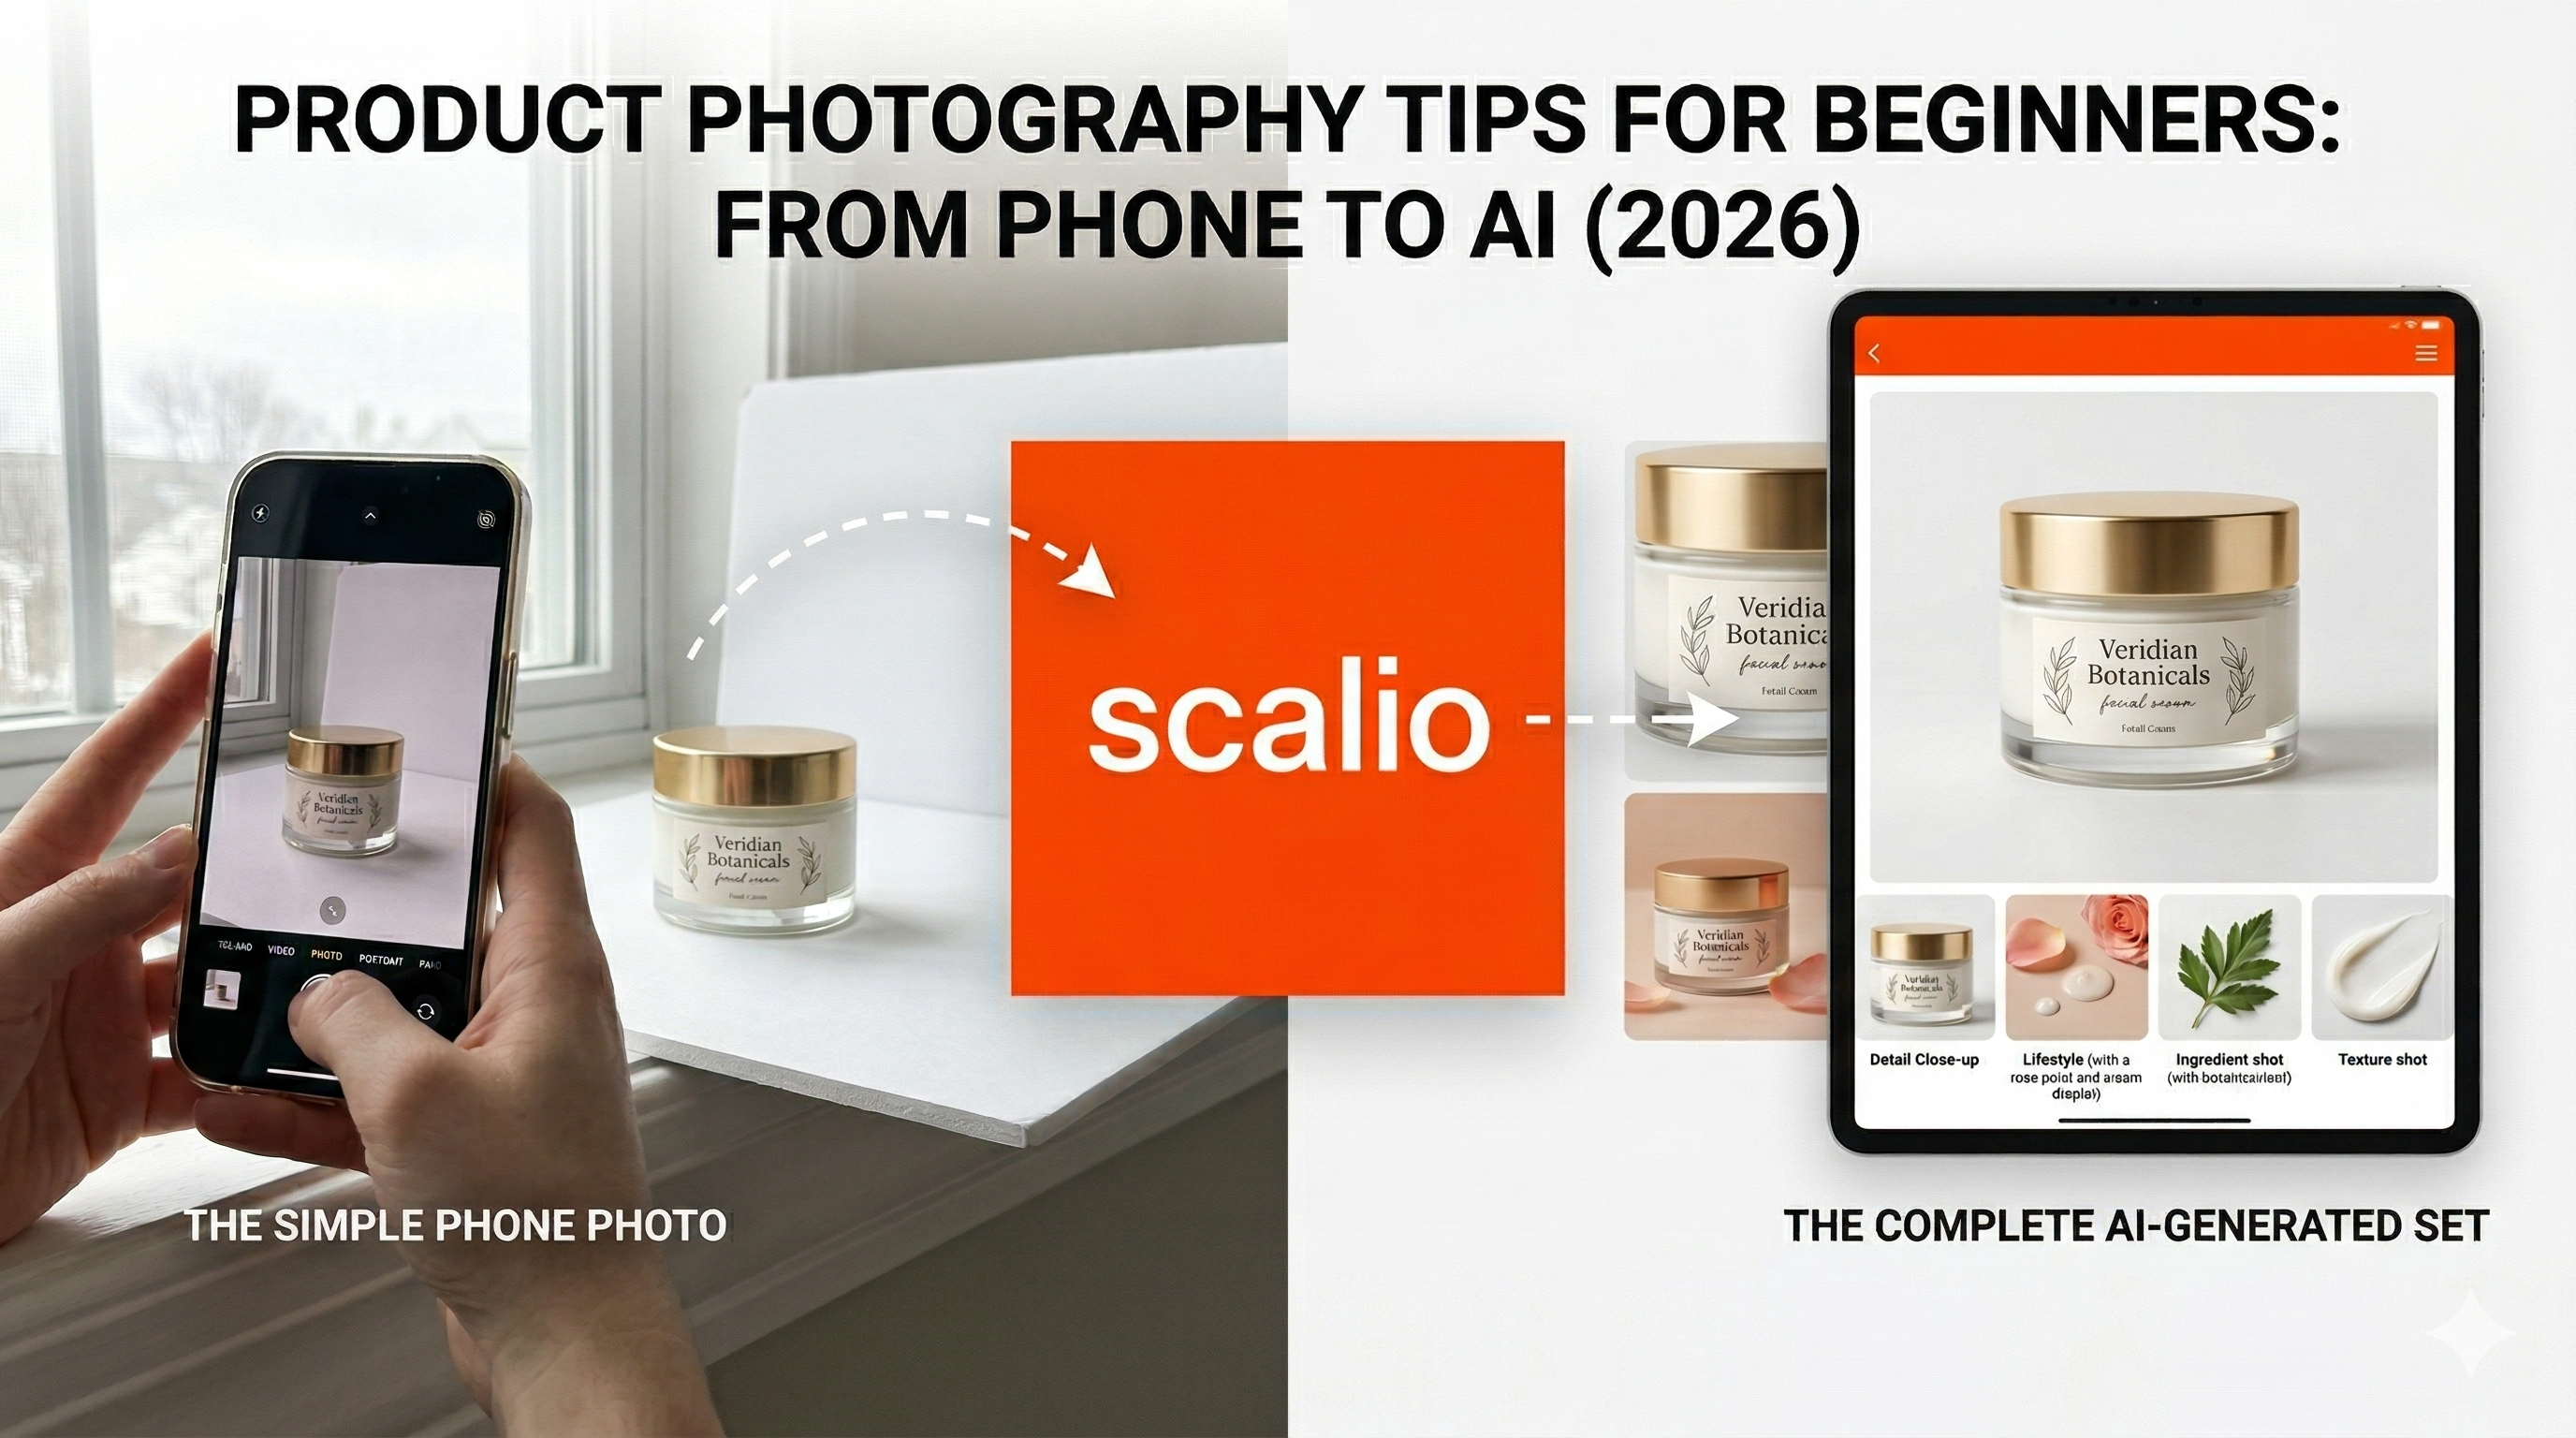
- In 2026, the fastest upgrade is AI — upload a phone photo to Scalio and get a full marketplace-ready image set in 60 seconds
Most beginners think great product photography requires expensive gear, a rented studio, and a professional photographer. The reality in 2026 is the opposite.
You can take marketplace-ready product photos with a ₹15,000 smartphone, a white foam board, and a window. What separates photos that convert from photos that do not is not equipment — it is knowledge of light, angles, and consistency.
This guide gives you that knowledge from scratch. We cover your beginner setup, the 10 tips that actually move the needle, the 7 mistakes that silently kill conversions, and how AI tools like Scalio let you upgrade a decent phone photo into a full studio-quality image set in under a minute.
Whether you are selling on Amazon, Myntra, Shopify, or Flipkart — this is where you start.
AI vs Traditional Photography — See the Difference →
Why Your Product Photos Are Your #1 Sales Asset
Before we get into how to shoot, let us be clear on why this matters.
- 93% of online shoppers say product images are the deciding factor in a purchase
- 22% of returns happen because the product looked different from its photos
- Up to 94% higher conversion rates are linked to high-quality imagery
- Shoppers are 3x more likely to buy when they can see a product from multiple angles
- 73% of all ecommerce sales now happen on mobile — your thumbnail is doing the selling before anyone clicks
A blurry photo, a shadow across your product, or an inconsistent background is not just an aesthetic problem — it is a revenue problem. In a marketplace where your listing sits next to dozens of competitors, your image is your first and most important pitch.
The good news is that fixing your product photography has one of the highest ROI of anything you will do for your store. And you can start today with what you have.
Getting Started with AI Product Photography →
The 6 Types of Product Shots Every Ecommerce Store Needs
Before you pick up your phone, you need a shot list. Here are the six shots every ecommerce store needs — and why each one earns its place:
| Shot Type | Purpose and When to Use It |
|---|---|
| Hero / Main Image | White background, product centred — required on Amazon, Myntra, Flipkart |
| Lifestyle Shot | Product in a real-world context — drives emotion; boosts social ad performance |
| Detail / Close-Up | Texture, stitching, label, finish — answers quality questions before they are asked |
| Scale Shot | Product next to a hand or familiar object — eliminates size uncertainty, reduces returns |
| Flat Lay | Top-down arrangement — ideal for apparel, accessories, kits, and bundles |
| On-Model | Garment on real or AI model — mandatory on Myntra; drives 76% more add-to-carts for apparel |
Each shot type answers a different question your buyer has before purchasing. Together, they eliminate doubt — and doubt is what stops conversions.
Flat Lay vs On-Model — Which Gets More Clicks in Social Ads →
Your Beginner Setup — What You Actually Need (Under ₹2,000)
The kit that gets you 80% of the way there costs under ₹2,000.
The Core Kit
- Smartphone — Any modern Android or iPhone. Use the rear camera, never the front-facing selfie cam. Lock focus by long-pressing on the product.
- Tripod / Phone Stand (₹300–₹600) — Eliminates blur, keeps every shot at the same height and angle, and is the foundation of catalogue consistency.
- White Backdrop (₹50–₹150) — White poster board, foam board, or a plain white wall. Curve the board up against a wall to create a seamless background with no corner shadow.
- Reflector Card (₹50) — A second piece of white foam board on the opposite side of your light source. Bounces light back and fills harsh shadows.
- Natural Light Source — A large window during daylight hours. Overcast days often produce the best light because clouds naturally soften and diffuse harsh shadows, which is also a common recommendation in beginner product photography guides.
Optional Upgrades
- Portable LED Softbox (₹800–₹1,500) — Useful when natural light is not consistent or when shooting in the evening.
- Lightbox (₹400–₹800) — Best for small products like jewellery, cosmetics, and electronics.
- White Sweep Paper — Creates a seamless background curve, eliminates corner shadows for the cleanest possible background.
10 Product Photography Tips That Actually Move the Needle

Tip 1 — Light Is Everything, and Natural Light Is Free
Shoot next to a large window during daylight hours. Overcast conditions are ideal — the clouds act as a natural diffuser that eliminates harsh shadows and produces soft, even light. Never use your phone's built-in flash. It flattens the product and creates blown-out highlights. Turn off all other room lights during the shoot to avoid competing colour temperatures.
Tip 2 — Always Use a Tripod
A tripod ensures every shot is the same height, angle, and distance — the foundation of catalogue consistency. When your images look consistent across every SKU, your store looks professional and trustworthy. Tap your screen to set focus on the product, then lock it before shooting.
Tip 3 — Clean Your Product Before Every Shoot
Dust, fingerprints, and lint are invisible in real life but glaring in photos. Use a microfibre cloth on glossy surfaces, a lint roller on fabric and soft goods, and cotton gloves when handling jewellery or glass. Check every label, seal, and edge before it enters the frame.
Tip 4 — Always Use a White Background as Your Default
White is the standard for marketplace main images — Amazon and Flipkart require it. Curve a white poster board up against a wall to create a seamless background with no corner shadow. This is the sweep technique used in professional studios.
Tip 5 — Shoot at Least 5 Angles
Front, back, side, detail close-up, and lifestyle — this is the minimum per product. Even Amazon recommends using multiple additional images to help customers evaluate what they are buying. Research consistently shows that shoppers need 3–4 images before making a purchase decision. More angles mean more trust, fewer returns, and fewer pre-purchase questions.
Tip 6 — Use Pro or Manual Mode on Your Phone
Lock exposure by long-pressing on the product before you tap the shutter. Adjust ISO to 100–200 for minimal grain. Never use digital zoom — it degrades quality significantly. If you need a closer shot, move the phone physically closer and crop in post if needed.
Tip 7 — Match Your Background to the Platform
- Amazon and Flipkart — Pure white background (RGB 255, 255, 255); product fills 85% of the frame
- Myntra — On-model images are mandatory for most apparel categories
- Shopify and Instagram — Lifestyle scenes consistently outperform white backgrounds
Tip 8 — Batch Shoot All Products the Same Day
Shooting different products on different days creates a catalogue that looks inconsistent and untrustworthy. Photograph every SKU in a single session with one lighting setup. Visual consistency across your catalogue is what separates stores that feel like brands from stores that feel like eBay listings.
Tip 9 — Edit, But Never Change the Product
Adjust white balance, brightness, and contrast — that is usually enough. Never alter the product's actual colour in post. Colour-corrected images that do not match the real product are the single biggest driver of returns in ecommerce. Free tools: Snapseed (mobile) and Adobe Lightroom Mobile (free tier).
Tip 10 — Optimise Every Image for the Web
Export at 2048px minimum. Compress to under 200KB using TinyPNG or Squoosh. Name your files descriptively: blue-ceramic-mug-front-view.jpg ranks in search; IMG_4732.jpg does not. Write alt text for every image — it improves both SEO and accessibility.
AI Image Upscaling — Fix Low-Resolution Photos Instantly →
✦ Turn Your Phone Photos into Studio-Quality Images with Scalio ✦Upload any product photo · Get hero, lifestyle & infographic in under 60 seconds
7 Beginner Mistakes That Kill Conversions
Most beginners focus on upgrading gear before fixing habits. The habits are what matter.
| Mistake | The Fix |
|---|---|
| Using the phone flash | Natural window light or a portable LED panel |
| Shooting handheld | Tripod — always, for every shot |
| Inconsistent backgrounds across catalogue | Batch shoot all SKUs in one session, same setup |
| Dirty or creased products | Clean and prep every product before it enters the frame |
| Only one angle per product | Minimum 5 angles: hero, back, side, detail, lifestyle |
| Using digital zoom | Move physically closer; crop in post if needed |
| Uploading without compression | Compress every image with TinyPNG or Squoosh before uploading |
The most common mistake? Inconsistency. A catalogue with mixed backgrounds, variable lighting, and different aspect ratios communicates one thing to buyers: this seller does not pay attention to detail. That is a conversion killer at every price point.
From Phone to AI — The 2026 Beginner Upgrade
You do not have to choose between DIY phone photography and expensive studio photography. In 2026, there is a third option — and it is faster than both.
The New Workflow
- Take a clean, well-lit phone photo of your product (plain background is fine)
- Upload to Scalio's Product Studio
- Remove the background automatically with AI Background Removal
- Choose a marketplace template — Amazon white background, Myntra on-model, Shopify lifestyle
- Export at 3000×3000, marketplace-compliant — ready to publish
Why This Beats Editing Apps
Editing apps fix the photo you took. AI generates the photo you need. One upload becomes a full image set: hero, lifestyle, and infographic — automatically generated from a single product photo. No editing skills, no Photoshop, no design software.
For ecommerce sellers managing dozens or hundreds of SKUs, this changes the maths entirely. What used to take days now takes hours. What used to cost lakhs in studio time now costs a fraction of that per month.
AI Photography Cost Advantage →
Product Photography Tips by Category
Apparel and Fashion
Steam or iron every garment before the shoot — visible creases are non-negotiable and signal low quality immediately. On-model images are mandatory on Myntra for most apparel categories. If booking a model is outside your current budget, Scalio's Model Studio generates on-model images from a flat garment photo — no shoot required.
Jewellery
Use a lightbox for soft, even light — reflective surfaces are the hardest category to shoot well and the most affected by harsh lighting. Shoot at a slight angle to reveal depth and dimension. For fine detail close-ups, a macro lens attachment (₹300–₹600) makes a visible difference.
Why Jewellery Brands Are Switching to AI Photography →
Beauty and Skincare
Texture and ingredient close-up shots drive purchase confidence more than hero images in this category — buyers want to see the product, not just the packaging. Lifestyle shots (product on a marble surface, morning light) significantly outperform white backgrounds for beauty on Shopify and Instagram.
Home Decor and Lifestyle Products
In-context room images are essential for home categories — buyers need to visualise the product in their own space before they can commit to a purchase. Natural light photography works especially well here, bringing warmth and authenticity to lifestyle-heavy imagery.
Frequently Asked Questions
1. Can I take professional product photos with just my phone?
Yes. Modern smartphones produce marketplace-quality images with the right lighting, a tripod, and a clean background. AI tools like Scalio then elevate those phone photos to full studio quality — no editing skills required.
2. How many photos should I take per product?
Minimum 6 per SKU: 1 hero white-background image, 3 additional angles, 1 detail close-up, and 1 lifestyle shot. High-competition categories benefit from 8–12 images per product.
3. What is the best background for product photography?
White is the standard for marketplace main images — Amazon and Flipkart require it. For social media and Shopify, lifestyle backgrounds (marble, wood, fabric) significantly outperform plain white in click-through and conversion rates.
4. What is the best lighting for product photography at home?
Natural light from a large window on an overcast day — soft, diffused, and free. Position your product table perpendicular to the window. Place a white foam board on the opposite side to reflect light back and fill in shadows. This setup costs under ₹100 and produces professional results.
5. How do I get Amazon-compliant product images without a studio?
Upload your product photo to Scalio's Product Studio, select the Amazon template, and export. Pure white background, correct margins, and 3000×3000 resolution — Amazon-compliant in one click.
6. What is the difference between a product photo and a lifestyle photo?
A product photo answers "what is it?" — clean background, product centred. A lifestyle photo answers "how will it look in my life?" — product in a real-world context. Both are essential: hero images convert on marketplaces, lifestyle images convert on social media and Shopify.
7. Can AI generate on-model images for my fashion products?
Yes. Scalio's Model Studio places your garments on realistic AI models with Indian poses and Myntra-ready framing — no shoot, no model booking, no studio required.
Start With Your Phone. Upgrade Your Product Photos With AI.
The gap between a product that looks handmade and a product that looks like a premium brand has never been smaller — or cheaper to close. A ₹2,000 beginner kit and the right technique gets you most of the way there. AI closes the rest of the gap instantly.
You do not need to become a photographer. You need to understand light, shoot consistently, and use the right tools. Start with what you have today.
✦ Start Taking Better Product Photos Today — Try Scalio Free ✦Try for free before choosing a plan · Amazon, Myntra, Shopify & Flipkart templates ready